Today myself and a good friend of mine had a discussion around how he could start to use Postman to generate random dates as part of a POST request he was trying to execute via Postman. After a little playing about we found that not only was this pretty straight forward but it was really powerful and so I thought I’d share what we did.
For this post we are going to demonstate using the Computers Database how we can not only add computers to the database but generate random data for the computer record so that we are not adding the same computer information each time we execute a POST request via Postman.
Generating a unique computer name
We are going to add a new computer and give it a random name to demonstrate how to use dynamic data in POST requests. Imagine you wanted to setup lots of dummy records, using the Postman collection runner you could for example run 100+ requests and generate lots of records very quickly using dynamic data with random numbers, dates etc.
Postman is pretty cool, not only can you setup a ‘Pre-request Script’ for each request but you can also setup ‘Pre-request Scripts’ to share for all of your collection requests. For this post we will be creating a ‘Pre-request Scripts’ which will be available for every request within our collection.
Creating the initial request
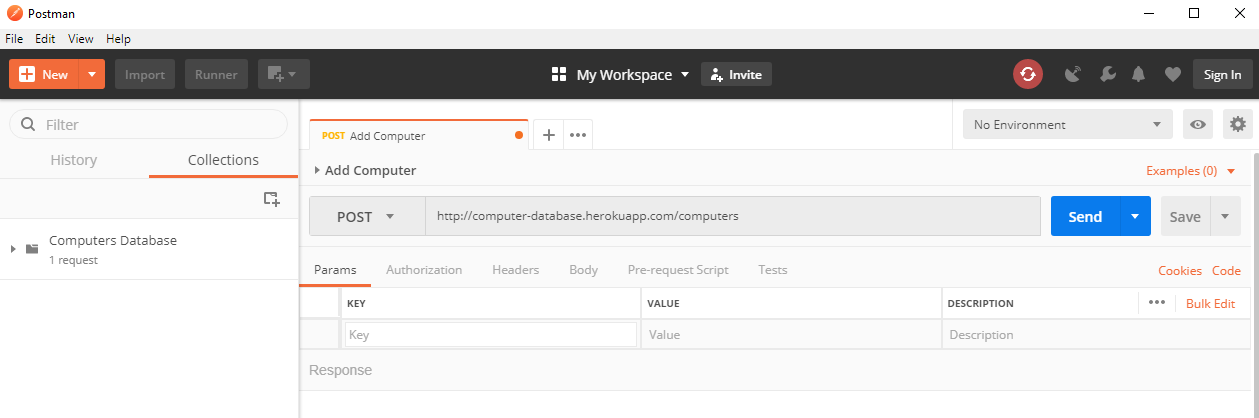
You may wish to create a new collection named ‘Computers Database’ if you want to follow along with this post. Next within the newly created ‘Computers Database’ collection add a new request by clicking on the ‘+’ tab. Change the requests type to ‘POST’ and input the following url for the request ‘http://computer-database.herokuapp.com/computers’ and then save the request by pressing ‘Ctrl’ + ‘S’ if on a Windows computer or by Pressing on the ‘Save’ button in the top right hand corner of Postman.
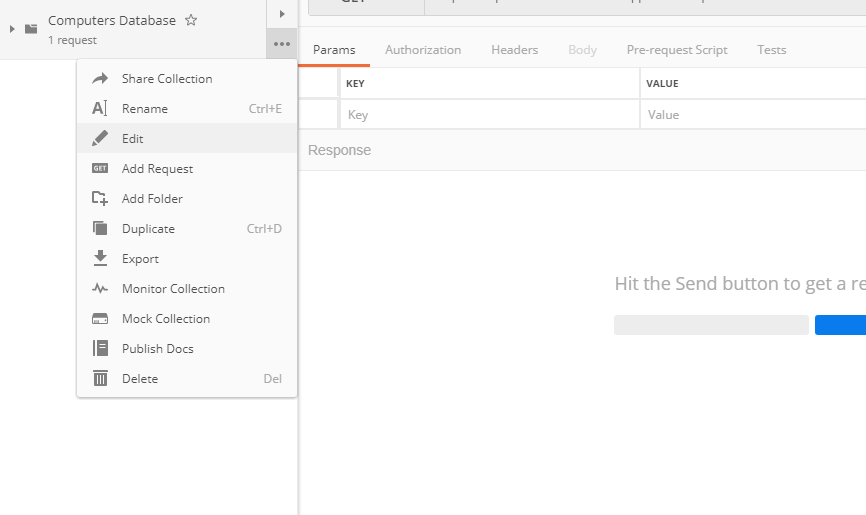
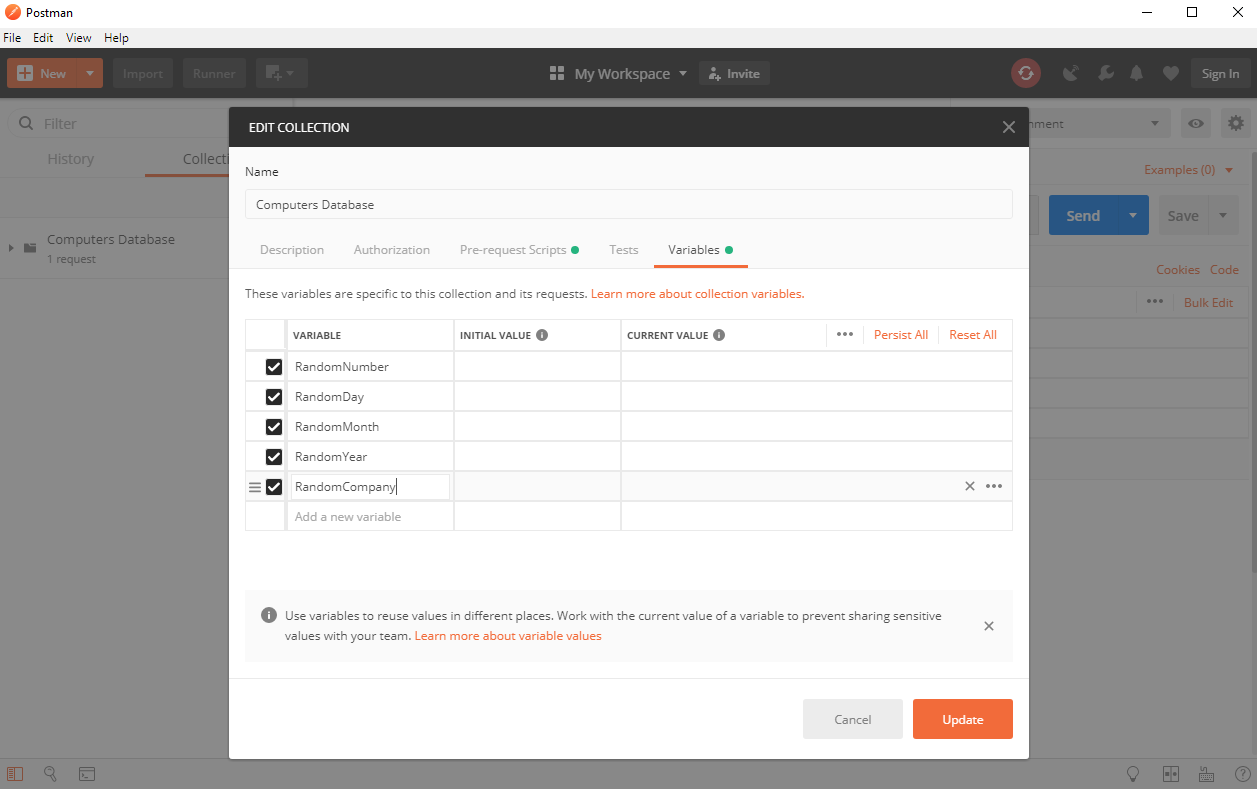
Next click on the ‘…’ button next to your newly created collection and then click on ‘Edit’. Click the ‘Variables’ tab.
Next add a new variable i.e. RandomNumber for this collection.

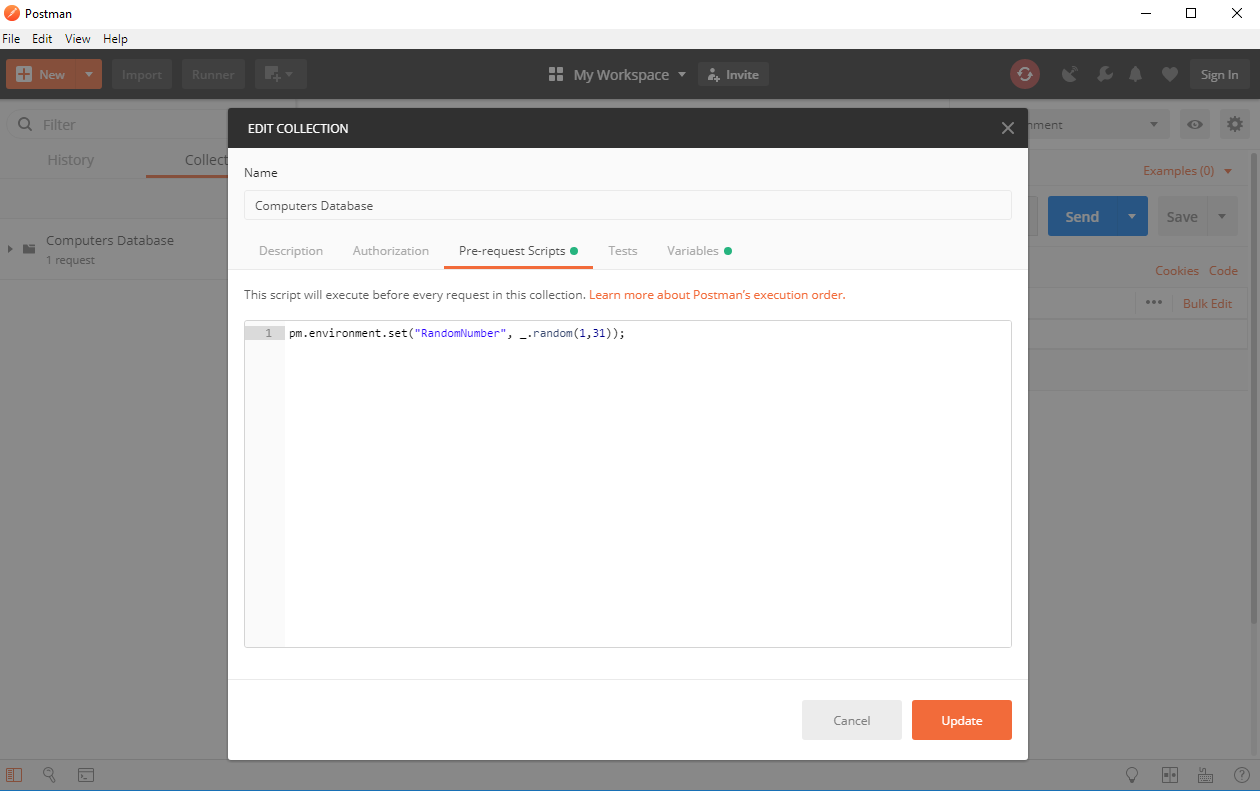
Now we want to set a random number to our variable named ‘RandomNumber’ each time we execute our POST request. Click the ‘Pre-request Scripts’ tab and paste the following: pm.environment.set(“RandomNumber”, _.random(1,31));
Here we set the variable we defined above with a random number between 1 and 31.
Next click on the ‘Update’ button to save your collection variable and pre-request script. Next we’re going to supply the name of the computer to post to the computer database. Click on the ‘Body’ tab and then for ‘KEY’ input ‘name’, and for ‘VALUE’ input ‘MyComputer’ followed by the variable name as shown below. This will ensure that our POST request now inserts a new computer with a name that starts with ‘MyComputer’ followed by a random number between 1 and 31.
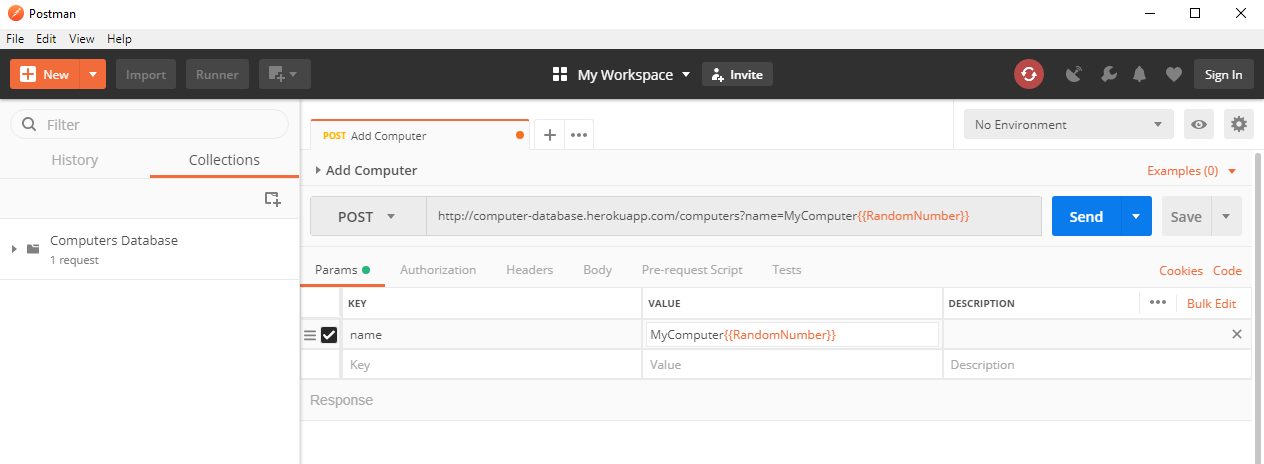
Next click on the ‘Send’ button to send the ‘POST’ request with our dynamic computer name. Now if we visit the Computers Database you will now see that a new computer has been added and automatically given a random number as part of it’s name.
Going one step further
So inputing a random number is great, but what if we wanted to start inserting a random introduced date when adding the new computer and we also wanted to select a random company?
Click the ‘…’ button again next to your newly created collection and then click on ‘Edit’. Click the ‘Variables’ tab again but this time we will add four more variables named; ‘RandomDay’, ‘RandomMonth’, ‘RandomYear’ and ‘RandomCompany’.
Next we want to assign random values to the variables we’ve just defined. Click the ‘Pre-request Scripts’ tab. In the real world you would want to add some logic to work out which months have 28, 30 or 31 days but for demo purposes we will keep it simple. Add the following code to the ‘Pre-request Scripts’
pm.environment.set(“RandomDay”, _.random(1,28));
pm.environment.set(“RandomMonth”, _.random(1,12));
pm.environment.set(“RandomYear”, _.random(2000,2020));
pm.environment.set(“RandomCompany”, _.random(1,43));
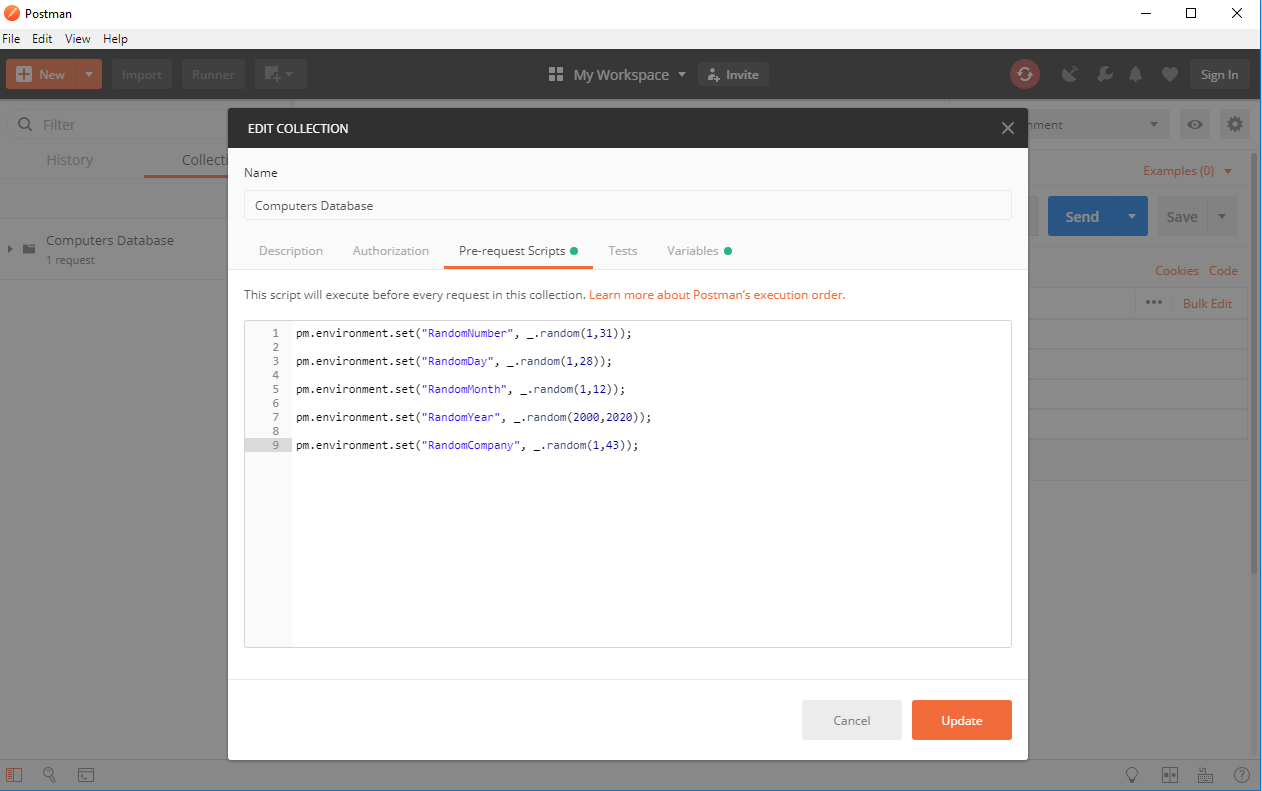
Finally click on the ‘Update’ button to save your collection variables and pre-request scripts.
Now we’re going to supply the introduced data of the computer and company name to POST to create the new computer in the computer database. Click on the ‘Body’ tab and then for ‘KEY’ input ‘introduced’, for ‘VALUE’ input the year, month, and day variables as shown below. This will help generate a new random date for each newly inserted computer. Again within the ‘Body’ tab for ‘KEY’ input ‘company’, for ‘VALUE’ input the computer name variable name as shown below. This will select a random company for each newly inserted computer.
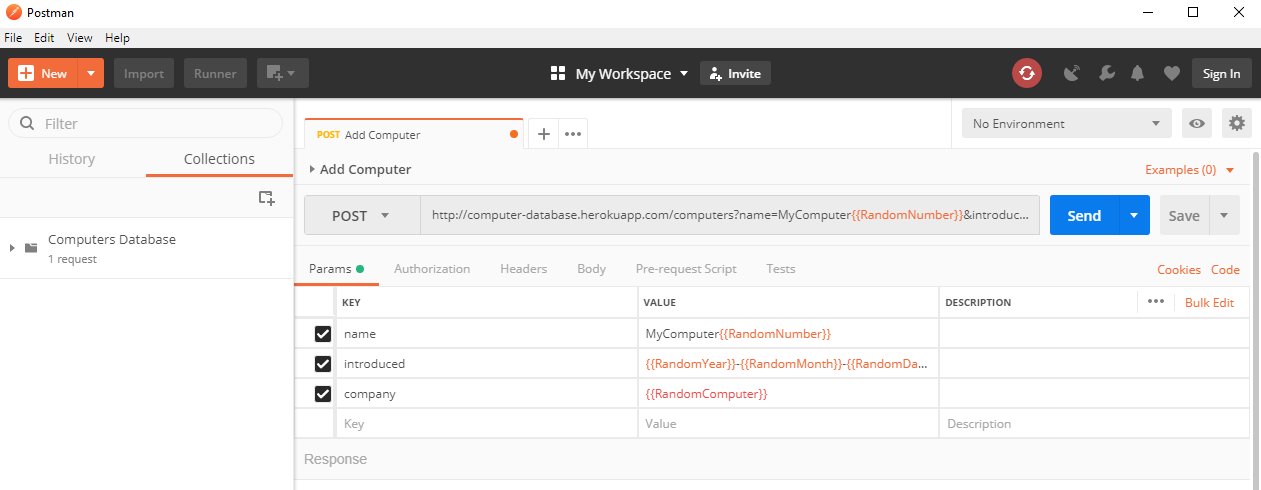
Next click on the ‘Send’ button to send the ‘POST’ request. Now you will see not only have we created a new computer with a dynamic name but we’ve also inserted a random introduced date and randomly selected a company for the newly inserted computer. Visit the Computers Database and you will see the newly added computer.
That’s all for now, I hope the above has wet your appetite and given you a little idea of just how awesome Postman is.